Basic usage
The VidStab class can be used as a command line script or in your
own custom python code.
Using from command line
# Using defaults
python3 -m vidstab --input input_video.mov --output stable_video.avi
# Using a specific keypoint detector
python3 -m vidstab -i input_video.mov -o stable_video.avi -k GFTT
Using VidStab class
from vidstab import VidStab

# Using defaults
stabilizer = VidStab()
stabilizer.stabilize(input_path='input_video.mov', output_path='stable_video.avi')

# Using a specific keypoint detector
stabilizer = VidStab(kp_method='ORB')
stabilizer.stabilize(input_path='input_video.mp4', output_path='stable_video.avi')

# Using a specific keypoint detector and customizing keypoint parameters
stabilizer = VidStab(kp_method='FAST', threshold=42, nonmaxSuppression=False)
stabilizer.stabilize(input_path='input_video.mov', output_path='stable_video.avi')
Advanced usage
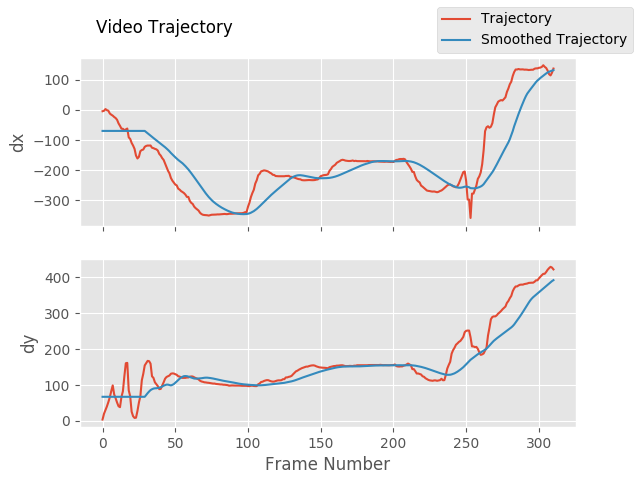
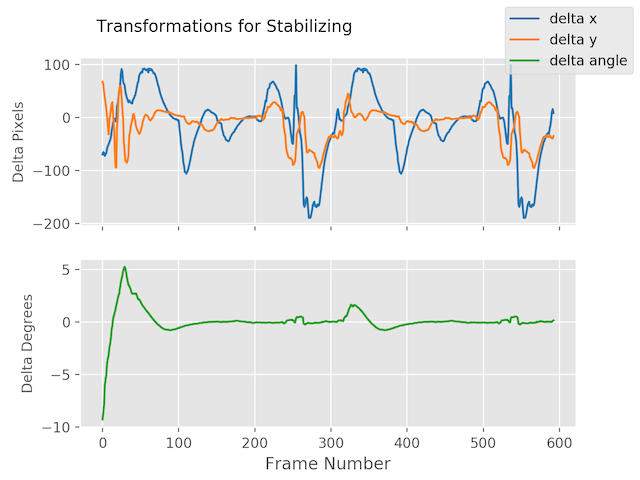
Plotting frame to frame transformations
from vidstab import VidStab
import matplotlib.pyplot as plt

stabilizer = VidStab()
stabilizer.stabilize(input_path='input_video.mov', output_path='stable_video.avi')

stabilizer.plot_trajectory()
plt.show()

stabilizer.plot_transforms()
plt.show()
Trajectories |
Transforms |
|---|---|
|
|
Using borders
from vidstab import VidStab

stabilizer = VidStab()

# black borders
stabilizer.stabilize(input_path='input_video.mov',
                     output_path='stable_video.avi',
                     border_type='black')
stabilizer.stabilize(input_path='input_video.mov',
                     output_path='wide_stable_video.avi',
                     border_type='black',
                     border_size=100)

# filled in borders
stabilizer.stabilize(input_path='input_video.mov',
                     output_path='ref_stable_video.avi',
                     border_type='reflect')
stabilizer.stabilize(input_path='input_video.mov',
                     output_path='rep_stable_video.avi',
                     border_type='replicate')
border_size=0 | border_size=100 |
|
|
|---|---|
|
|
Videoused with permission fromHappyLiving
Using Frame Layering
from vidstab import VidStab, layer_overlay, layer_blend

# init vid stabilizer
stabilizer = VidStab()

# use vidstab.layer_overlay for generating a trail effect
stabilizer.stabilize(input_path=INPUT_VIDEO_PATH,
                     output_path='trail_stable_video.avi',
                     border_type='black',
                     border_size=100,
                     layer_func=layer_overlay)


# create custom overlay function
# here we use vidstab.layer_blend with custom alpha
#   layer_blend will generate a fading trail effect with some motion blur
def layer_custom(foreground, background):
    return layer_blend(foreground, background, foreground_alpha=.8)

# use custom overlay function
stabilizer.stabilize(input_path=INPUT_VIDEO_PATH,
                     output_path='blend_stable_video.avi',
                     border_type='black',
                     border_size=100,
                     layer_func=layer_custom)
|
|
|---|---|
|
|
Videoused with permission fromHappyLiving
Automatic border sizing
from vidstab import VidStab, layer_overlay

stabilizer = VidStab()

stabilizer.stabilize(input_path=INPUT_VIDEO_PATH,
                     output_path='auto_border_stable_video.avi',
                     border_size='auto',
                     # frame layering to show performance of auto sizing
                     layer_func=layer_overlay)

Stabilizing a frame at a time
The method VidStab.stabilize_frame() can accept numpy arrays to
allow stabilization processing a frame at a time. This can allow
pre/post processing for each frame to be stabilized; see examples below.
Simplest form
from vidstab.VidStab import VidStab

stabilizer = VidStab()
vidcap = cv2.VideoCapture('input_video.mov')

while True:
     grabbed_frame, frame = vidcap.read()

     if frame is not None:
        # Perform any pre-processing of frame before stabilization here
        pass

     # Pass frame to stabilizer even if frame is None
     # stabilized_frame will be an all black frame until iteration 30
     stabilized_frame = stabilizer.stabilize_frame(input_frame=frame,
                                                   smoothing_window=30)
     if stabilized_frame is None:
         # There are no more frames available to stabilize
         break

     # Perform any post-processing of stabilized frame here
     pass
Example with object tracking
import os
import cv2
from vidstab import VidStab, layer_overlay, download_ostrich_video

# Download test video to stabilize
if not os.path.isfile("ostrich.mp4"):
    download_ostrich_video("ostrich.mp4")

# Initialize object tracker, stabilizer, and video reader
object_tracker = cv2.TrackerCSRT_create()
stabilizer = VidStab()
vidcap = cv2.VideoCapture("ostrich.mp4")

# Initialize bounding box for drawing rectangle around tracked object
object_bounding_box = None

while True:
    grabbed_frame, frame = vidcap.read()

    # Pass frame to stabilizer even if frame is None
    stabilized_frame = stabilizer.stabilize_frame(input_frame=frame, border_size=50)

    # If stabilized_frame is None then there are no frames left to process
    if stabilized_frame is None:
        break

    # Draw rectangle around tracked object if tracking has started
    if object_bounding_box is not None:
        success, object_bounding_box = object_tracker.update(stabilized_frame)

        if success:
            (x, y, w, h) = [int(v) for v in object_bounding_box]
            cv2.rectangle(stabilized_frame, (x, y), (x + w, y + h),
                          (0, 255, 0), 2)

    # Display stabilized output
    cv2.imshow('Frame', stabilized_frame)

    key = cv2.waitKey(5)

    # Select ROI for tracking and begin object tracking
    # Non-zero frame indicates stabilization process is warmed up
    if stabilized_frame.sum() > 0 and object_bounding_box is None:
        object_bounding_box = cv2.selectROI("Frame",
                                            stabilized_frame,
                                            fromCenter=False,
                                            showCrosshair=True)
        object_tracker.init(stabilized_frame, object_bounding_box)
    elif key == 27:
        break

vidcap.release()
cv2.destroyAllWindows()
![]()
Working with live video
The VidStab class can also process live video streams. The
underlying video reader is
cv2.VideoCapture(documentation).
The relevant snippet from the documentation for stabilizing live video
is:
Its argument can be either the device index or the name of a video file. Device index is just the number to specify which camera. Normally one camera will be connected (as in my case). So I simply pass 0 (or -1). You can select the second camera by passing 1 and so on.
The input_path argument of the VidStab.stabilize method can
accept integers that will be passed directly to cv2.VideoCapture as
a device index. You can also pass a device index to the --input
argument for command line usage.
One notable difference between live feeds and video files is that webcam
footage does not have a definite end point. The options for ending a
live video stabilization are to set the max length using the
max_frames argument or to manually stop the process by pressing the
Esc key or the Q key. If max_frames is not provided then no progress
bar can be displayed for live video stabilization processes.
Example
from vidstab import VidStab

stabilizer = VidStab()
stabilizer.stabilize(input_path=0,
                     output_path='stable_webcam.avi',
                     max_frames=1000,
                     playback=True)

Transform file writing & reading
Generating and saving transforms to file
import numpy as np
from vidstab import VidStab, download_ostrich_video

# Download video if needed
download_ostrich_video(INPUT_VIDEO_PATH)

# Generate transforms and save to TRANSFORMATIONS_PATH as csv (no headers)
stabilizer = VidStab()
stabilizer.gen_transforms(INPUT_VIDEO_PATH)
np.savetxt(TRANSFORMATIONS_PATH, stabilizer.transforms, delimiter=',')
File at TRANSFORMATIONS_PATH is of the form shown below. The 3
columns represent delta x, delta y, and delta angle respectively.
-9.249733913760086068e+01,2.953221378387767970e+01,-2.875918912994855636e-02
-8.801434576214279559e+01,2.741942225927152776e+01,-2.715232319470826938e-02
Reading and using transforms from file
Below example reads a file of transforms and applies to an arbitrary video. The transform file is of the form shown in above section.
import numpy as np
from vidstab import VidStab

# Read in csv transform data, of form (delta x, delta y, delta angle):
transforms = np.loadtxt(TRANSFORMATIONS_PATH, delimiter=',')

# Create stabilizer and supply numpy array of transforms
stabilizer = VidStab()
stabilizer.transforms = transforms

# Apply stabilizing transforms to INPUT_VIDEO_PATH and save to OUTPUT_VIDEO_PATH
stabilizer.apply_transforms(INPUT_VIDEO_PATH, OUTPUT_VIDEO_PATH)