
Adam Spannbauer
Data Scientist/Instructor・Mostly write Python & R for pay・Mostly write p5js for fun・Check me out @thespanningset on Instagram
Image Classification with Keras in R & Python
Published Feb 14, 2018
This post is a comparison between R & Python for applying the pretrained imagenet VGG19 model shipped with keras.
|
|
The comparison for using the keras model across the 2 languages will be addressing the classic image classification problem of cats vs dogs. The scripts have been written to follow a similiar framework & order.
The steps of the process have been broken up for piecewise comparison; if you’d like to view either of the 2 full scripts you can find them here: R & Python.
Please note: Although this is an ‘R v Python comparison’ the R keras library sits on top of a python process under the covers. So the comparison is concerning the interface and syntax.
That’s enough prefacing; let’s start classifying pets.
Libraries & Modules
The first step to our scripts will be to load up our resources.
The keras R library covers most our needs for this script; the base R libraries will provide the rest of the functionality.
In python we’ll load up glob for working with paths, numpy for some data manipulation, pandas to convert our output to a DataFrame (this isn’t needed, but is used to match the R output for more direct comparison), & keras (we also pull out some specific functions to call directly).
R
library(keras)
Python
import glob
import numpy as np
import pandas as pd
import keras
from keras.preprocessing import image as image_utils
from keras.applications.imagenet_utils import preprocess_input, decode_predictions
Helper Functions
Next we’ll define some functions to aid in the classification.
In both languages we’ll define a function to preprocess the images and class labels.
The pretrained model we’re using expects a certain input structure. The image_preprocessor functions across the 2 languages are written almost entirely with keras functions, so they are very similar. The R version could be written with pipes (%>%) if preferred, but I left them out to highlight the similiarity between the 2 languages.
The next helper function written is to read in imagenet labels. Imagenet doesn’t have a ‘cat’ or ‘dog’ class but rather it has breeds of cats and dogs for labels. I have pasted the breed labels for the 2 animals into files that can be found here.
The read_dog_cat_labels function is a utility to read in these label files and convert the contents to the format that will be outputted by our model. Once our classifications are made, we’ll use the lists created by this helper function to slap on a simple ‘cat’ or ‘dog’ label.
R
# define image preprocessor for use with keras vgg19
image_preprocessor = function(image_path) {
    image = image_load(image_path, target_size = c(224,224))
    image = image_to_array(image)
    image = array_reshape(image, c(1, dim(image)))
    image = imagenet_preprocess_input(image)
    return(image)
}

#function to read in files housing all cat/dog breeds in imagenet labels
read_dog_cat_labels = function(path) {
    labs = readLines(path)
    labs = trimws(unlist(strsplit(labs, ',')))
    labs = gsub('\\s+', '_', labs)
    return(labs)
}
Python
# define image preprocessor for use with keras vgg19
def image_preprocessor(image_path):
   image = image_utils.load_img(image_path, target_size=(224, 224))
   image = image_utils.img_to_array(image)
   image = np.expand_dims(image, axis=0)
   image = preprocess_input(image)
   return(image)

#function to read in files housing all cat/dog breeds in imagenet labels
def read_dog_cat_labels(path):
   labs = list(open(path))
   labs = [item.split(',') for item in labs]
   labs = [item.strip().replace(' ','_') for sublist in labs for item in sublist]
   return(labs)
Read and Process Images
Before we can classify the images we’ll have to read them into memory and preprocess them into a format that our model understands; luckily we just wrote some functions to do that for us, all we need to do is apply them. Below in both languages we create a list of file paths for our images, and then apply our image_preprocessor function to each file path. After these chunks we have a list of image objects ready to be classified by our model.
R
# define image paths to classify
image_paths = list.files('images', recursive = TRUE, full.names = TRUE)

# preprocess images
image_list = lapply(image_paths, image_preprocessor)
Python
# define image paths to classify
image_paths = glob.glob('images/*/*')

# preprocess images
image_list = [image_preprocessor(path) for path in image_paths]
Load Model and Classify
With our input ready to go we can load the pretrained model, and apply it to our images. Sticking with the recurring theme of this write up, the model load step is similiar across the 2 languages.
With our model loaded we use the different syntaxes of R and python to produce predictions given a list of images. In R we use lapply to iterate over our image_list while in python we use list comprehensions.
In addition to generating our predictions, we also apply provided functions to decode the predictions and give us the human readable labels.
R
# load vgg19 model pretrained with imagenet
model = application_vgg19(weights = 'imagenet')

# get model prediction
preds = lapply(image_list, function(i) {
    imagenet_decode_predictions(predict(model, i), top = 1)[[1]]
})
Python
# load vgg19 model pretrained with imagenet
model = keras.applications.VGG19(weights = 'imagenet')

# get model predictions
preds = [model.predict(image) for image in image_list]
preds = [list(decode_predictions(pred, top=1)[0][0]) for pred in preds]
Pretty-up Results
Coming into this last step we have our classification results in each language’s version of a list. In R we have a list of data.frames & in python we have coerced our output to be a list of lists.
In these last chunks we’re going to add in the coverall classes of ‘cat’ & ‘dog’. We also convert the outputs to be housed in similar tables for easy comparison.
R
# convert list of predictions to df and drop class name column
pred_df = do.call(rbind, preds)
pred_df$class_name = NULL

#read in breed labels
dog_labs = read_dog_cat_labels('data/dog_classes.txt')
cat_labs = read_dog_cat_labels('data/cat_classes.txt')

#create column for labeling dog breeds as dog and cat breeds as cat
pred_df$catdog = NA
pred_df$catdog[pred_df$class_description %in% dog_labs] = 'Dog'
pred_df$catdog[pred_df$class_description %in% cat_labs] = 'Cat'

#add column with image paths
pred_df$file_name = unlist(image_paths)
pred_df = pred_df[order(-pred_df$score),]
Python
# convert list of predictions to df and drop class name column
pred_df = pd.DataFrame(preds)
pred_df = pred_df.drop(0, 1)

#make names match names in R output for consistency
pred_df.columns = ['class_description', 'score']

#read in breed labels
dog_labs = read_dog_cat_labels('data/dog_classes.txt')
cat_labs = read_dog_cat_labels('data/cat_classes.txt')

#create column for labeling dog breeds as dog and cat breeds as cat
pred_df['catdog'] = np.nan
pred_df.loc[pred_df.class_description.isin(dog_labs), 'catdog'] = 'Dog'
pred_df.loc[pred_df.class_description.isin(cat_labs), 'catdog'] = 'Cat'

#add column with image paths
pred_df['file_name'] = image_files
pred_df = pred_df.sort_values('score', ascending=False)
View Output
When we view our output we see that everything went well in both processes and we have the same exact output (apart from rounding in the different print methods).
One thing you’ll notice is that we don’t have very high confidence for most predictions, this is because we’ve undermined the actual classification by balling up all cat/dog breeds. The score relates to how confident the model was in predicting a certain breed. If we trained a classic cat/dog model we should see an increase in these scores.
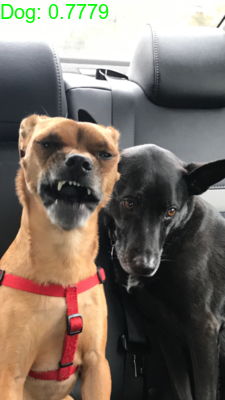
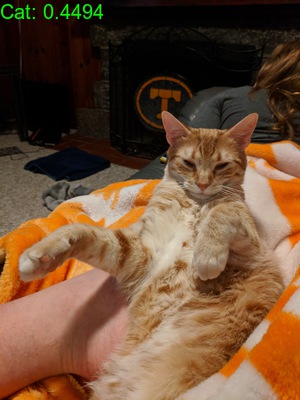
Below the classification info I’ve included 2 example output pics. The labels were added to the pictures in R with the magick library; the code used to do this can be seen at the end of this script. Adding labels can be done just as easily in python. I chose to do it in R since I typically work with images using python and opencv (& I wanted to learn something new).
If you want to view all the images relating to this output you can view them here.
R
print(pred_df)

#   class_description     score catdog                              file_name
# 6         Chihuahua 0.7779192    Dog     images/dogs/tonks_scary_sneeze.png
# 3             tabby 0.4777499    Cat       images/cats/google_tabby_cat.jpg
# 2      Egyptian_cat 0.4494216    Cat        images/cats/goober_lounging.jpg
# 1              chow 0.2780781    Dog images/ambiguous/tonks_jasper_bone.jpg
# 4              lynx 0.1475925    Cat            images/cats/lilly_perch.jpg
# 5             boxer 0.1071659    Dog             images/dogs/tonks_beer.jpg
Python
print(pred_df)

#   class_description     score catdog                               file_name
# 1         Chihuahua  0.777919    Dog      images/dogs/tonks_scary_sneeze.png
# 4             tabby  0.477750    Cat        images/cats/google_tabby_cat.jpg
# 3      Egyptian_cat  0.449422    Cat         images/cats/goober_lounging.jpg
# 5              chow  0.278078    Dog  images/ambiguous/tonks_jasper_bone.jpg
# 2              lynx  0.147593    Cat             images/cats/lilly_perch.jpg
# 0             boxer  0.107166    Dog              images/dogs/tonks_beer.jpg
|
|
|