
Adam Spannbauer
Data Scientist/Instructor・Mostly write Python & R for pay・Mostly write p5js for fun・Check me out @thespanningset on Instagram
Wedding Ring Classifier
Published Oct 23, 2019
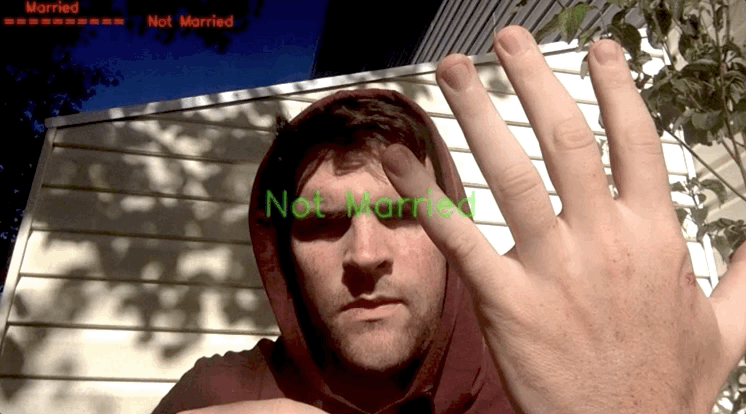
Over the past weekend, I got married! So, of course, I had to write a honeymoon blog post. For a quick project, I built a married/not married classifier that’s trained on images of my hand with/without a wedding ring on. This post will cover the end-to-end process of gathering training images, extracting features, and building the classifier with Python, OpenCV, Keras, and Scikit-learn. The final output can be seen in the below gif.
This post is going to be written at a very high level. All the code used for this post can be found on GitHub.
Gathering training images
The full script used to gather training images can be seen on GitHub.
To easily gather training images, I used OpenCV’s VideoCapture() to take snapshots with my webcam. By pressing m, images are saved with the label “Married”; if n is pressed, then images are saved with the label “Not Married”. Using this method, you can easily and quickly build up training images.
Images saved to the “Married” class contained my left hand with my wedding ring on. Images saved to the “Not Married” class contained my left hand without any ring. No images of the ring on the wrong finger were included in training set. 279 images were collected in total (151 “Married” & 128 “Not Married”).
Below is a gif showing what I looked like in front of my webcam posing for these pictures.

Extracting features
![]()
The full script used to extract features from images can be seen on GitHub.
A good place to start for getting features out of images, is with a pre-trained imagenet model (aka transfer learning). The VGG16 model from the keras.applications module can be used with the option include_top=False to change the model’s behavior from classification to feature extraction. By applying this model to all of our input image’s we’ve now moved from a database of images, to a database of features that can be used as inputs to our classifier.
In this project, the hdf5 file format was used to save all the features extracted from the images. The code used to interact with hdf5, was adapted from some code in PyImageSearch’s “PyImageSearch Gurus” course (which I highly recommend).
Training the model
The full script used to train the classifier can be seen on GitHub.
Since we’re only dealing with 2 classes (“Married” & “Not Married”) we can keep everything simple by using logistic regression. For this process, sklearn.linear_model.LogisticRegression was used and the model was trained on 90% of the data. The model’s performance on the test data (as shown by sklearn.metrics.classification_report()) shows that our model is either performing really well or it’s overfit ¯\(ツ)/¯. We’ll trudge on anyways.
              precision    recall  f1-score   support

     married       1.00      1.00      1.00        22
 not_married       1.00      1.00      1.00         6

    accuracy                           1.00        28
   macro avg       1.00      1.00      1.00        28
weighted avg       1.00      1.00      1.00        28
Deploying the model
The full script used to demo the model on webcam input can be seen on GitHub.
To deploy the model, OpenCV’s VideoCapture was used to read in frames from the webcam. One at a time, the frames have their features extracted, and then they’re classified as “Married” or “Not Married” by the now trained classifier.
Note, testing out this model proved that our impeccable accuracy on the test data was more due to overfitting than being great. This overfitting caused the classifier to not be very robust to new hand positions. The overfitting is likely caused by a lack of diversity in the training data.
Despite the overfitting, there are some positions where the model performs well. The below gif shows one of these cases.